
1. Start Adobe Photoshop.
2. Create a new document and make it 12”x12” or 3600x3600pixels at 300DPI.

3. Select the color you want your paper to be. For the purpose of the tutorial I will use Orange.
4. Fill your canvas with a color of your choice. I used Edit -> Fill Layer ->Foreground color

5. For this step you will need to have the pumpkin face overlay psd file that was included with this tutorial or another psd overlay. If you only have png overlays, open the png file in Photoshop and then save it as a psd file.
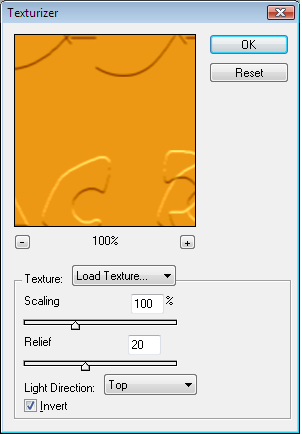
6. Select Filter -> Texturizer
7. Select Load Texture. Navigate to the location of the psd overlay you want to use. For the purpose of this tutorial I will load pumpkinfaceoverlay.psd

8. Adjust the scaling and relief until you are satisfied with the results
9. Here is an example of mine once the Texture has been applied.

Here is the tutorial in PDF format, the overlay in PSD format and also the pumpkin face overlay in PNG for those that do not use Photoshop.

You can pick these up here at 4shared.
Just a quick note to let you know that a link to this post will be placed on CraftCrave in the DigiFree category today [04 Oct 09:00pm GMT]. Thanks, Maria
ReplyDeleteThank you so much for this post. I want to let you know that I posted a link to your blog in CBH Digital Scrapbooking Freebies, under the Page 1 post on Oct. 05, 2011. Thanks again.
ReplyDeleteGreat tutorial. Thank you.
ReplyDeleteLove Joan xx